September 10, 2012

Shop Makeover

I've been getting a little antsy with my Etsy shop and decided that it needed a bit of a makeover. Running around after a 15-month-old, cleaning the house (sometimes), cooking dinner, and filling orders (especially after my magazine mention!) really cuts down on the amount of time I have to work on my shop. So, even though I have a long list of changes I'd like to make, I've been trying to stick to small changes or changes that can be broken down into smaller chunks of work/time-commitment so eventually it will all get done.

Here are some things that have been done:


1. New shop banner (new font):

New Etsy shop Banner for Acts of Craftiness

2. New packaging (trying out a few things) - stitched parchment paper:

New packaging for Acts of Craftiness on Etsy

Here are some things I am currently working on:


1. Update all pattern files
 * This is a HUGE task, so I have broken it down into steps. I think I'm about a quarter of the way done, but right now the light at the end of the tunnel is very dim.

2. Launching a new product line

3. Setting up monthly giveaways through the end of the year (or longer if I like them!).

September 6, 2012

Breaking News!

Four days ago, I woke up to a message from a customer in the UK asking about my Custom QR Code cross stitch pattern. Along with her question, she mentioned that she saw me in Cross Stitch Crazy Magazine. What?! I wasn't fully awake, so I figured I read that part wrong. I rubbed my eyes a few times before re-reading the message, but it was still there. I hadn't submitted anything to the magazine, so this was an awesome surprise!

I ordered a paper copy of the magazine, but it wasn't actually for sale to non-subscribers yet and they are in the UK, so I knew it was going to take a while to get to me. The issue (November 2012 - #169) was released today, and I downloaded it through the Cross Stitch Crazy iPad app.

My face hurts from non-stop smiling!


September 4, 2012

7 Monthaversary

My shop's 7 Monthaversary was on September 1st. August was pretty slow, but it allowed me to spend some time relaxing, stitching, and celebrating.

Here are a few highlights from my 7th month on Etsy:
  • I reached 70 sales
  • I added some new QR Code ornament patterns and kits
  • I reworked my molecule patterns and stitched them up
  • I added 1 new state to my reach map (I'm up to 40% of the country!)
Acts of Craftiness celebrates 7 months on Etsy!

August 31, 2012

Jen's Awesome Chicken Marinade

I've been using this chicken marinade recipe almost every week for over a year, and it still didn't have a proper name. I had it written in my recipe notebook as simply "Chicken Marinade." I used it again last night and I tried to brainstorm a new name. The best I could come up with was "Sweet and Tangy Chicken Marinade." Over dinner I asked my husband what he thought of the name, and he said I should just call it "Jen's Awesome Chicken Marinade," so here it is!

Jen's Awesome Chicken Marinade
Seriously delicious chicken awaits

Jen's Awesome Chicken Marinade

1/4 cup cider vinegar
3 Tbsp course ground or whole grain mustard
3 tsp minced garlic
1/2 cup brown sugar
1 lime, juiced
1/2 lemon, juiced
1 tsp salt
3 Tbsp olive oil
ground black pepper
  1. Add all ingredients to a bowl and whisk together. Cover chicken with the mixture. I like to use a large zippered baggie.
  2. Marinate the chicken for at least two hours before cooking.
  • This recipe makes enough for 6-8 chicken breasts.

August 24, 2012

Did You Miss Me?

I've been mostly M.I.A. recently, but it was for good reasons. August is usually a pretty busy/crazy month for my family, but it was even more so this year. Here's a glimpse into what August had/has in store for me this year:
  • My birthday
  • Our wedding anniversary
  • My husband's birthday
  • My shop featured HERE
  • My husband slammed with work and gone the whole month
  • Living like a single mom (with all the duties that go along with it)
  • A teething 14-month-old (molars!)
  • Trying to spend time with my next to youngest sister before she goes off to college
  • Working on shop stuff
  • Our neighbors moving - We have a shared driveway and have to deal with the movers, workers, stagers, realtors, house shoppers, etc. outside our front door and blocking our garage and driveway.
  • Cousin's baby shower
  • Wedding dress shopping with another sister
  • A family reunion
  • Blah, blah, blah
It's been an exciting month so far, but I am looking forward to life slowing down a little bit.

August 19, 2012

My Birthday & A Blog Feature!

So . . . it's my birthday!  This is the beginning of my yearly "Three Day Celebration." Today is my birthday, tomorrow is my wedding anniversary, and the next day is my husband's birthday. Crazy? Maybe. Fun? Definitely!

Also, the planets have aligned, and my shop is featured over at the fAveritte Creations blog today. What a great birthday present! Head on over and check it out.  :)


August 9, 2012

Super Easy, Super Delicious Brownies

I first made this recipe a little over a year ago. I was dying for some chocolately goodness and had my mind set on some brownies. I had just had my son and didn't have a fully stocked fridge or pantry, and running to the store wasn't an option. I found it unbelievably difficult to find a brownie recipe that I had the right ingredients to make.

After searching for a recipe much longer than I had anticipated, I found this beauty. The brownies it makes are soft and a little gooey, almost like fudge. What started out as an "OMG, I just need some brownies right now and I'll try anything" recipe has become my go to dessert recipe. I hope you try it and love it!


Super easy, super delicious brownies
Yummy chocolate fix

Super Easy, Super Delicious Brownies

Makes 9-12 brownies - Or one really big one!

1 cup sugar (super fine if you have it)
1/2 cup flour
1/4 cocoa powder
1/4 cup butter, very soft or melted
2 eggs

  1. Preheat oven to 325 degrees.
  2. Grease an 8"x8" pan with butter or a light coating of cooking spray.
  3. Add all of the ingredients to a mixing bowl. Mix thoroughly - a hand mixer is best. You can't over-mix the batter, so have at it.
  4. Pour the mixture into the greased pan.
  5. Bake for 25-30 minutes, until it pulls away from the edges of the pan slightly. The brownies will still be soft and slightly wet inside.
  6. Let the brownies cool before cutting.

August 7, 2012

Wordless Wednesday - August 8th

Play Time: Paint Baggie

I've been trying to figure out some fun new play time activities to do at home with my 14-month-old son. He seems to be fine just playing with the same toys and reading the same books day in and day out, but I know it's better for him to have varied activities to get his little brain working (and I get bored)! I came up with a few easy, little to no mess ideas to try out.

My little guy had a lot of fun with this activity. It's a great way for kiddos to start learning how to draw shapes and write out letters and numbers. If you use more than one color in the baggie, they will also learn about how mixing two colors (or more) creates new colors (or what looks like dumpster gravy if you mix every color together!).

For lack of a better name, here is my Paint Baggie.

Paint baggie activity
Baby A playing with a paint baggie

Supplies:

Zippered freezer baggie - Baggies meant for the freezer are thicker and better for this.
Paint - I just used some inexpensive poster paint from the craft store. I got the primary colors (red, blue, and yellow) figuring he could play with mixing the colors together.
Tape - I used packing tape. It was easy to get more coverage than you can get with regular tape.

Supplies need for the paint baggie activity - paint, zippered baggie, and tape
Supplies needed for this activity

The Crazy Easy Instructions:

  1. Open the zippered baggie.
  2. Pour some paint into the baggie. The amount you need is dependent on the size baggie you are using and how full you want the baggie to be. Play with it to find what works best for you.
  3. Carefully seal the zippered baggie (super important!).
  4. Tape the baggie to a low window or sliding glass door. The light coming through the glass helps your little one see all the designs they are creating. I ended up having to tape all four sides of the baggie to the window because Baby A was obsessed with trying to rip the baggie off the window. After adding more tape, he played with it correctly for a long time.
  5. Let your little one have fun.
 * So far, this baggie has been taped to the window for three days. It's still going strong despite being in the sun a lot of each day and having a kiddo smacking it repeatedly. We'll see how long it lasts.

August 4, 2012

The Evolution of a Light Box

Before I opened my Etsy shop, I did a lot of research and read a lot in the forums and in the Etsy Sellers' Handbook to prepare myself, hoping to set myself up for success. One thing that you hear and read over and over and over again is that good product photography is key to having a successful Etsy shop. It makes complete sense; your photos give the buyer their first impression of your item. If your pictures are blurry, unfocused, or dark, the buyer may never click on your item to get to the awesome description you wrote.

I know that good lighting and clean backgrounds (especially white backgrounds) are what many strive for, so when setting up to take my first product photos, this was my aim too. I started out with a very basic set up and have ended up with a pretty sweet, homemade light box.


Here is the evolution of my light box:

Basic photo shoot set up using white poster board
My super basic photo set up

#1: As Basic As It Gets


White background - check.
Natural light - check.
My pictures should be awesome, right? - nope.

So, how basic is basic? As you can see in the picture, basic for me meant white poster board propped up against random household objects and placed on the floor in natural light. I probably looked really silly laying on my stomach on the floor trying to get in close to take my pictures. I'm glad my husband wasn't home during my photo shoots!

At first, I thought that my pictures looked great with this set up, and I was super excited about getting all my items photographed. After being on Etsy for a short while, I realized that the pictures I took with this set up were not great and that the grayish background had to go. Here's an example:
Example photo before and after - basic photo set up vs. light box and photo editing
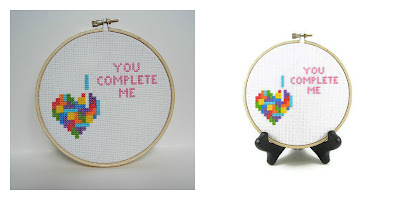
From my first photo shoot to my new light box + minor editing

#2: My First Light Box


I won't go into great detail here because this light box sucked.

My first light box began its life as a plain old brown cardboard box. I used this tutorial to help me. The materials were easy to find (a cardboard box, tissue paper, tape, white poster board), and the process took less time than I thought it would. I removed the top flaps of the box and cut out panels on the left and right sides. Then, I taped sheets of white tissue paper over each side cut out. I used the poster board as the background for the picture. I got two cheapy desk lamps from Target and pimped them out with full spectrum light bulbs from Amazon. Full spectrum bulbs are more expensive, but they will help you get a nice, white light that you can't get with regular bulbs. They really help improve light box photos. The lamps are positioned next the tissue paper covered cut outs, shining into the box.

Using this light box, I was able to control my lighting much better than I could with natural light, but I still couldn't get nice, white photos (even with photo editing). I always had shadows in the corners/edges of my photos, and cropping didn't always fix the problem. After reading more about light boxes online, I realized that one problem was that the inside of my box wasn't white. Light wasn't bouncing off of the brown areas, which created the shadows. I could probably have gotten away with taping some white paper inside the box, but I had a better idea. I'd start with material that was already white had a stronger structure.

I wish I had a picture of this light box, but after many hours trying get good photos using it, I destroyed it in frustration.

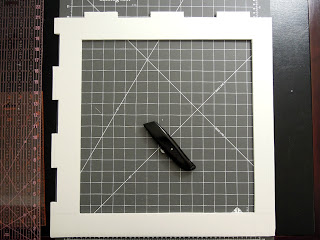
#3: My Second Light Box


One panel of a collapsible light box showing the "tabs" you cut
An example of the "tabs"
I used this tutorial to help make my second light box. This set up seemed to fit all of my needs. Since it's made out of white foam core, the inside is white, which helped reduce the shadows I had in my photos using my first light box. Foam core is more rigid than a regular cardboard box, so the light box is a lot more stable. As an added plus, it's collapsible, so I can take it apart for flat storage. The pieces fit together without tape, so it's easy to assemble and disassemble. This is a very nice feature since my photo set up is on the dining room table. We don't use that table often, but it's nice to be able to easily stash my shop stuff away when we have company.

To make the light box, you start out by cutting down your pieces of foam core into squares. Then, you have to carefully plan out where you'll cut out tabs on the edges of intersecting walls of the box. If you cut the tabs correctly, your box walls should fit together like a 3D puzzle. Use the poster board inside the box as a seamless background. Shine desk lamps on the inside walls on the left and right (this is the thing that ultimately didn't work for me and led to my third light box).

I was so excited to have this new light box finished. I wanted to retake all of my photos and update all my Etsy listings. But, I took one series of photos with it and knew something still needed to be tweaked. My photos were just as bad as the ones I took with my brown cardboard box, ugly shadows everywhere. Shining the lights on the solid inside walls of the box made it very difficult to bounce the light in the right places. But, then, I had an idea! What if I made cut outs on the left and right sides, covered them with white tissue paper, and shined the light through the paper like I did with my first light box? Brilliant!

I really wish I had taken step-by-step photos of the process, but when I made my light box, I wasn't planning to share it with anyone. You can see step by step pictures in the tutorial I linked. And, again, I don't have a picture of this version of my light box, but it's the same as my 3rd/current light box except that the sides were left whole.

#4: My Third (and Hopefully Final) Light Box


My current light box set up made from white foam core and tissue paper.
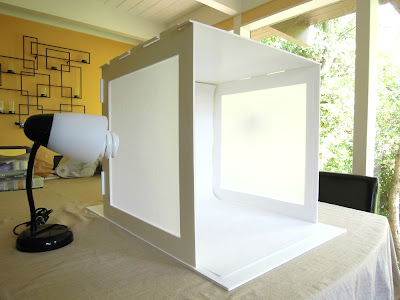
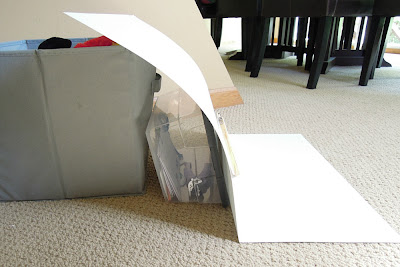
My current light box - I'm very happy with it.  :)
One light box cut out before being covered with white tissue paper
One cut out before being covered with white tissue paper
I used my second light box as the base for this box. I made cut outs on the left and right sides (marked two inches in from the edges), covered the cut outs with white tissue paper (tape in place), and got my lamps in position on the sides. Done.

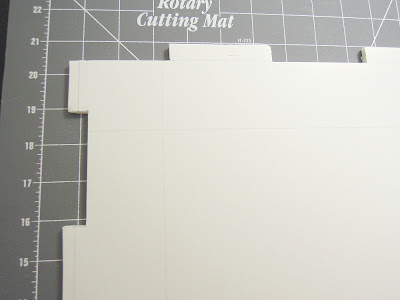
Another realization I had while putting this together was that the "white" poster board I was using wasn't really pure white, and it was affecting my photos negatively. So, I used some very white drawing paper meant for an easel for my back drop. It's lighter weight than poster board, so I needed to find a way to anchor it in place so it wouldn't slide down inside the box. The solution I came up with was to cut tabs at the top end of the paper and feed the tabs through the gaps at the top of the light box. The top piece of the light box helps hold the paper in place. You can see what I mean in the picture below. Another thing I like about using easel drawing paper is that I have a whole roll of it, and it's easy to swap in a new piece if my background paper gets dirty or marked up from moving things around on top of it.

Paper background "tabs" hanging out the back of a light box
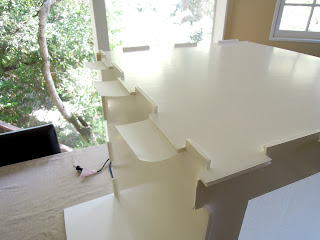
Paper "tabs" hanging out the back of the light box
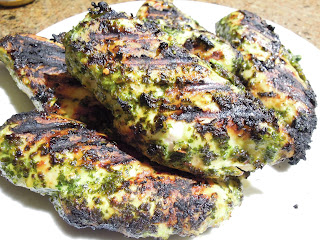
This set up has definitely been the best of everything I have tried. My pictures still need a bit of editing to get a really white background, but it's nothing compared to what I was working with before. I've had a lot of luck using a combo of PicMonkey and FotoFuze to get my white backgrounds.

* In my pictures, you can see that my box is sitting on top of another piece of white foam core. This piece is not necessary for making or using your light box. I had an extra piece laying around, so I use it as a base for my box.

August 2, 2012

Wordless Thursday - August 2nd

I'm doing Wordless Thursday this week because I couldn't miss celebrating my shop's half birthday on Wednesday, and I needed words for that.  :)

Doberman doesn't like the 2012 Olympic Opening Ceremony

August 1, 2012

6 Monthaversary!

It's my Etsy shop's half birthday! The last six months have flown by at warp speed, so it's nice to sit down and look at how far the shop has come. Even though I could be considered a "creative," I am addicted to number crunching, spreadsheeting, and color-coding. I have fun analyzing sales and revenue, which items are more or less popular, the ups and downs of views, and all the love my shop and items have gotten (love those hearts!) - Not all of these end up in spreadsheets!  :)

While putting together my six month reach map, I realized that I had missed two countries on my last map (Afghanistan and New Zealand) - Oops! This month I got to add two new U.S. States, Colorado and Missouri - only thirty-one more to go!
Six month reach map for Acts of Craftiness on Etsy
Six Monthaversary

July was about the same as June as far as views and sales go, but I'm not really surprised by that. I didn't add very many new items in July, but I did do a lot of work in the shop, tweaking listing info and photos.

Yesterday, I got to be the center of attention for the SF Etsy Team's first shop critique Twitter Chat. I was a little nervous about having people checking out my shop, specifically looking for changes that could be made, but it was a really awesome experience. When you think about a "critique," you automatically think about "what's wrong with what you did," and that can be intimidating. But, good critiques also point out things that you did well. The SF Etsy Team gave a great critique. It was really nice to get positive feedback about things that I've done well in addition to constructive comments about things I could improve upon. And, instead of just leaving me with a general list of improvements that could be made, they also helped brainstorm ways to implement those changes. I often find myself wanting to make a change (or knowing that one needs to be made) but not knowing where to begin. This is where having more heads is better than one. Now, thanks to my shop critique, I have more awesome shop updates in the works.

August is a happening month in our family. My birthday, our wedding anniversary, and my husband's birthday are coming up; they are actually on three consecutive days! Plus, we have some other events for family and friends to attend. I'm hoping things will be exciting in my shop too. I'd love to have even more to celebrate.

July 29, 2012

Bacon-Wrapped Potato Bites & Spicy Sour Cream Dipping Sauce

A few months ago, I was searching for a new recipe to make for book club. I usually stick with items that are chilled or room temperature so the food travels well. But, when I get the opportunity to host, I try to make something hot or more complicated to take advantage of being able to cook it right before people arrive. I found a recipe that involved bacon, and I was sold! The book club ladies raved.

This weekend included a visit with my parents. My mom commented about needing to come up with some appetizers to serve family friends that would also be visiting. Remembering the awesomeness that is this recipe (and really wanting to eat some), I shared the recipe with her. I forgot to get a picture before everyone attacked the plate, but you can tell they were great.

Bacon-wrapped potato bites with spicy sour cream sauce
They're so good I couldn't get a picture before they were almost all gone!


Bacon-Wrapped Potato Bites With Spicy Sour Cream Dipping Sauce

For the potatoes:

1 lb small or medium red potatoes (one-bite sized potatoes would be even better)
1 1/2 tsp chopped, fresh rosemary
1 Tbsp olive oil
1/2 tsp salt
freshly ground pepper
12-16 oz bacon
toothpicks

For the dipping sauce:

1 cup (8 oz) sour cream
1 tsp hot sauce - or to taste (Any brand you like will do. I've used Tabasco and an Asian chili garlic sauce, and both were great.)
salt and pepper

Directions:

  1. Preheat the oven to 400 degrees.
  2. Wash and dry the potatoes. Chop them into 1-inch pieces, keeping the chunks roughly the same size. Put the potatoes in a medium pot, cover them with cold water, and salt the water.
  3. Bring the water to a boil. Let it boil for about 3 to 4 minutes, until you can stick a fork into the potatoes without too much resistance. You want the potatoes to be almost, but not fully, cooked so they don't fall apart while being wrapped.
  4. Drain the potatoes and put them in a large bowl. Add the rosemary, olive oil, salt, and a few grinds of pepper. Toss until the potatoes are evenly coated.
  5. Cut the bacon strips in half. Wrap each piece of potato in a half-strip of bacon, securing it with a toothpick.
  6. Put the potatoes on a foil or parchment-lined baking sheet. You may need to cook the potatoes in two batches so the baking sheet isn't too crowded.
  7. Bake the potatoes for 15 minutes, then flip each piece. Bake them for another 10 to 15 minutes, until the bacon is cooked through and crisp.
  8. Mix the sour cream and hot sauce in a small bowl. Season with salt and pepper.
  9. Pile the potato bites on a plate and serve them alongside the dip
  10. Eat more than you probably should!  :)

July 28, 2012

Magnetic Nail Polish

One of my sisters (Hi, Allie!) is a nail polish addict. I'm pretty sure she re-polishes her nails multiple times a week. We've talked about trying out magnetic nail polish since it first came out, and we finally bought some during my last visit.

After spending way too much time trying to decide which colors to get, I just tossed one of each color in the basket. I've been searching for a nice silver, so that was the first polish I tried out.

The directions for using the magnetic polish are pretty simple:
  1. Apply one coat of the polish and let it dry.
  2. Apply a second coat.
  3. While the second coat is wet, hold the magnet (attached to the top of the bottle) above each nail for 10-15 seconds.
  4. Be amazed at your new nail art - I added this one.  :p
After following these directions for the first hand, I was disappointed with the results. The only nail that really looked like it was supposed to was my thumb (see below). I was hoping to have better results.

For my left hand, I decided to do the second coat of polish and use the magnet one finger at a time. This method really made a difference. I also noticed that the effect worked better if I used more polish, so don't skimp on it. I wish I had a picture of my left hand to show you so you could see the difference, but the polish was badly chipped by the time I took photos.

magnetic nail polish effect

July 23, 2012

The 101 Most Useful Websites

I happened upon this post, The 101 Most Useful Websites, and I feel like I know nothing about the internet! I went through this list and had only heard of or seen 12 out of the 101 listed. TWELVE! That's a measly 11.8% (yep - I needed to include the .8). That sucks.

After finding this list, I clicked around a bit and found a few sites that will definitely come in handy. Here are some of my new favs:
  1. screenr.com – record movies of your desktop and send them straight to YouTube
  2. polishmywriting.com – check your writing for spelling or grammatical errors (everyone should use this!)
  3. everytimezone.com – a less confusing view of the world time zones
  4. deadurl.com – helps you get get back to your bookmarked web pages that have been deleted
  5. woorank.com – research a website from the SEO perspective (can run one free report a week)
** Check out the full list, and let me know if I'm not alone with this 11.8%. Which sites do you think you'll use?

July 22, 2012

Weekend Wrap-Up

Another busy weekend done.

My husband had to work a lot this weekend (trial starts in a week), so I got to spend a ton of time with Mr. Baby.  :) I managed to be somewhat productive too. I found some felt I've been looking for (for two weeks) in my crafting stash, read a bit in The Handmade Marketplace, and worked on some stuff for the shop.

I finally finished stitching up the last few of my new QR Code pieces and started getting the backs finished. I originally planned to get them all finished and ready to list by the end of the weekend (so today), but I decided at the last minute to take some step-by-step photos of the process I go through to finished the backs of my hoop art so I could share it here. I always forget how much more time a photo shoot takes. Needless to say, I didn't get the backs finished. Boo.

I'm really excited to get these new pieces listed in the shop. Maybe I'll finally get them done and listed tomorrow.

Picture of QR Code ornaments
I swear, these are almost done!

July 19, 2012

Grilled Tri Tip with Tequila-Lime Marinade

This is seriously the best tri tip marinade ever. I think I might be a little addicted to it.

Grilled Tri Tip with Tequila-Lime Marinade

sliced grilled tri tip steak
I wish I had grilled it a little less.  :(
 2 2-lb. tri tips, trimmed

For the marinade:

1/2 cup lime juice
1/2 cup cilantro, chopped
1/2 cup olive oil
1/3 cup soy sauce
1/4 cup tequila
7 garlic cloves, finely chopped
2 tsp ground cumin
2 tsp dried oregano
1 tsp freshly ground black pepper

Whisk the marinade ingredients in a medium bowl. Easy, right?

Optional meat preparation (optional because some will tell you to leave the fat on the tips and that it is sacrilege to pierce meat before cooking): Trim the tri tips - remove as much fat as you can. Using thin, sharp knife, pierce the meat all over.

Place the meat in a resealable plastic bag, and add the marinade. Squeeze as much air out of the bag as possible, and seal it all up.

Let the meat marinate for at least 2 hours, but overnight is even better. Keep the meat refrigerated, and turn the bag occasionally. Make sure to take the meat out of the refrigerator at least 30 minutes before you are ready to grill. You never want to grill cold meat. The outside will cook and the inside will be raw!

Prepare your BBQ and set the heat to medium-high. Remove the tri-tips from the marinade and grill it to your desired doneness (about 10 minutes per side for medium).

Transfer the meat to a plate or cutting board. Tent the meat with foil and let it rest for 10 minutes. After the 10-minute rest, cut the tri tips diagonally, across the grain. Yum!  :)

Grilled tri tip with a foil tent cover
Grilled Tri Tip With Foil Tent
grilled tri tip after 10-minute rest
Grilled Tri Tip After 10-minutes Rest

* You can freeze this! Prepare your meat and cover it in the marinade in a resealable freezer bag. Having one of these in the freezer, ready to go, has saved my butt numerous times. You never know when you'll have last-minute dinner guests or you just don't have time to go to the grocery store.

July 15, 2012

Weekend Wrap-Up

I've been behind on posting because I have actually managed to keep myself super busy with productive stuff the past few days. Here are the highlights of my weekend:
  1. Celebrated my dog's 3rd birthday by taking her to the dog park to get some energy out and to the groomer to get a pedicure.
  2. Cleared a bunch of super tall weeds from our front yard. It no longer looks like it's been neglected for three years, and you can see the flowering plants and trees the weeds were blocking now.
  3. Finished stitching some more new QR code cross stitch pieces.
  4. Stretched all of the already stitched pieces I had laying around and started preparing them for finishing the backs.
  5. Finished putting together my new and improved light box. Hopefully this is the winning design.
  6. Took some product pictures using my new light box.
I still have a few more QR codes to stitch up (more color options). Then, I need to stretch, finished, and photograph the new product line. I'm hoping to get the new items in the shop this week. No more slacking!

Picture of a light box photography set up
The final version of my light box (I hope)!
QR code cross stitch pieces
Only 5 more to stitch up

July 12, 2012

Insalata Caprese - The Best Salad Ever!

My all-time favorite salad is the caprese. Maybe it's because I'm Italian. Maybe it's because it is so simple to make. No matter what the reason, this salad is unbelievably delicious.

Traditionally, caprese salads are made using thick slices of tomato, sliced rounds of fresh mozzarella cheese, and basil leaves with a drizzle of olive oil and balsamic vinegar drizzled over the top.

Picture of insalata caprese (caprese salad) from wikipedia
Insalata Caprese - from Wikipedia

The way I make my caprese is a little different. It all started when my husband (then fiance) was in law school and I was the only one working (at a craptastic job). I never let myself buy fresh mozzarella, but I really wanted to make a caprese salad. I had some cherry tomatoes, some fresh basil, and . . . string cheese! Yup. String cheese. I sliced those cheese sticks into rounds, cut the tomatoes in half, and chopped up the basil. I topped it all with a few drizzles of olive oil and balsamic and gave everything a quick toss. I was a happy camper. The texture of the cheese wasn't right, but the flavor was good. I'd like to say that this was a one time deal, but I have to confess that I think I made it this way until we got real jobs and I let myself buy the right ingredients.

I have been buying real, fresh mozzarella to make my caprese salads for a few years now, but I still use cherry tomatoes and make it like a tossed salad.

Pictue of the ingredients for a caprese salad - tomatoes, mozzarella cheese, and basil

Insalata Caprese

10 oz cherry or grape tomatoes
8 oz fresh mozzarella cheese
1/4 cup fresh basil, chopped (measure after chopping)
1 Tbsp olive oil
2 tsp balsamic vinegar
salt and pepper

Cut the tomatoes in half (lengthwise for grape tomatoes).

Caprese salad - tomatoes, fresh mozzarella cheese, basil, olive oil, and balsamic vinegarIf you are using bocconcini (small fresh mozzarella balls), you can leave them whole or cut them in half or quarters. If you are using larger balls of fresh mozzarella, cut the ball down into pieces that are close to the same size as your tomatoes after slicing.

Tear, slice, or chop the basil.

Combine the chopped tomatoes, mozzarella, and basil in a bowl. Drizzle the olive oil and balsamic vinegar on top. Season with salt and pepper to taste. Mix everything well.

You can eat the caprese right away, but it tastes better if you let it sit for a bit and let the flavors marry.

A Quick Tip For Chopping Basil

Step by step picture tutorial for how to make a basil chiffonade and how to chop basil
1: Remove the basil leaves from the stalks.

2: Stack the leaves, largest on the bottom. Work your way up to the smallest leaves. This step does not have to be neat and tidy. Just make sure you have the largest leaf on the bottom.

3: Roll the leaves up. Make sure the smaller leaves are covered as much as possible.

4: Start at one end of the basil roll. Make thin slices down the length of the roll.

5: You now have a bunch of basil ribbons, or a "chiffonade." Basil ribbons are beautiful, so you can stop here if you like.

6: To finish the chop, slice across the rolls of basil.

July 8, 2012

Weekend Wrap-Up

It's been busy at our house the last few days, but I've managed to squeeze in a little time to stitch here and there. I thought I had finished all of my samples for my newest QR Code items, but I may have to stitch up a new one in blue.

After spending hours trying to match up embroidery floss colors with the colors of the ribbon I plan to use, I discovered that I didn't have enough of the blue ribbon I found in my stash. It's a fairly common brand, but after visiting both craft stores in my area, I came up empty. Both stores carry the brand, but they had three other blues - one is too light, one is too dark, and the other is more of a teal instead of a blue.

I was super excited about having the perfect colors chosen, but now I have to figure something else out. In the meantime, the next step for these little guys is to get them stretched and framed in hoops and finish the backs. I'll post pictures when they're done.  :)

Picture of QR Code cross stitch pieces waiting to be stretched in hoops.
Some new QR Code cross stitch pieces

My blue ribbon saga of sadness:


Shades of blue ribbon
Still searching for the perfect blue ribbon


July 5, 2012

In Need of a 12-Step Program


I love lists. I'm a master list-maker. If there was a job where all you had to do was make lists and then list out all of the lists you made, I would be a shoe-in. I have lists that have sub-lists. I am addicted to color-coding my lists (which is a sickness itself). I have lists in multiple locations, some of which list the same things as other lists. When Apple added the Reminders app to iPhone, I was excited because I could have all of my lists with me wherever I go.

My top ten best (longest) lists are for:
  • General Crap To Do
  • Things To Buy (separated by store)
  • Things To Return
  • Gift Ideas
  • Crafts To Make
  • Reviews To Write (for Amazon)
  • Blog Posts To Write
  • Deep Cleaning List (separated out by frequency of cleaning - weekly/monthly/seasonally)
  • Home Improvements To Make (separated out by room/zone)
  • My ever-lengthening Shop To Do List.
Whew! Uh oh. I just realized that is another list of lists.  :-/

If only list-making resulted in actually getting stuff done. By the time I pull out my list(s), cross off the very minimal amount of items I have completed and re-evaluate what's left, I don't have time to actually do anything on the list! I think list-making might be the ultimate procrastination technique. You get to put off actually doing work by thinking about all the work you have to do. Maybe it's time for a mid-year resolution.

July 3, 2012

Chipotle-Style Cilantro-Lime Rice

More food! I know! I think I might be a little addicted to it.  :p

Anyway, yesterday I wrote about one of my "go to" sauces. Today, I'm letting you in on a little side dish secret. I love Chipotle. I could eat it every day. Every Day. BUT, it's really not all that great for you. About a year ago, I happened upon a woman that tries to make lighter versions of dishes, including some Chiptole recipes (Skinny Taste). I found her recipe for Chipotle's Cilantro-Lime Rice through Pinterest. After making her version, I decided that I could cut more salt and oil out of the recipe to make it even better for you, without sacrificing taste. Here's my version:

Chipotle's Cilantro-Lime Rice

3 - 3.5 cups cooked extra long grain  rice or basmati rice (about 1 cup pre-cooked)
1 Tbsp lime juice
2 tsp vegetable oil
3 Tbsp fresh cilantro, chopped
3/4 tsp salt

In a medium bowl, combine the chopped cilantro, lime juice, oil, and salt. Stir to combine. Add the rice, and toss until completely mixed.

Enjoy!

July 2, 2012

Grilled Chicken with Chimichurri

Every now and then I find a recipe that is a real hit with my husband. Chimichurri is one of those recipes.
Grilled Chicken with Chimichurri
 Chimichurri is a sauce that originated in Argentina, but it's also used extensively in many other countries. It is super simple to make and is packed with flavor. It's usually used to top grilled meat (any kind), but I've also heard of people using it to sauce other foods, like potatoes. One of my favorite ways to use it is as marinade for chicken.

There are a million different recipes for chimichurri, but this is the one I like to use:

Chimichurri Sauce

Makes enough to marinate 6-8 chicken breasts, with a little extra to use to top the chicken after grilling.

2 cups flat leaf Italian parsley - about one bunch - stems okay
4 large garlic cloves (if you use pre-minced garlic like I do, it's about 4 tsp total)
1/2 tsp red pepper flakes (or to taste)
1/4 cup red wine vinegar
1/2 cup olive oil
salt and pepper to taste

You can spend lots of time chopping everything up and then mix it all together, but I prefer to toss it all in my food processor and let it whirl. I trim the very bottom off the parsley stalks and toss them in whole, stems and all. Don't be scared to do this. It saves so much time!

The mixture should be chunky.

If you are using your chimichurri as a marinade, make sure you put some aside first so you can use it to top the cooked meat.

The chimichurri can be made up to 5 days in advance and should be refrigerated. Bring it to room temperature before serving.

Step by step photos of the making of chimichurri sauce.

July 1, 2012

5 Monthaversary!

It's time for another shop update! It's been five months since I opened my Etsy shop, and I have never been more excited about my craft. Each new sale gives me an awesome adrenaline rush, and I get inspired to create more.

This past month, I got my 50th sale (half of my 2012 goal!) and I got to add to my reach map (Florida, Washington, D.C., and Denmark). The shop does better and better each month, so I can't wait to see what I can accomplish in month six!

Seeing this map start to fill in is so awesome!

June 30, 2012

Weekend Wrap-Up

I've been slightly more productive since my last WIP post. Besides the regular shop stuff, I reorganized my supplies (in a haphazard sort of way, so I'll have to do a better job next time) and finished two custom patterns. I've also made a teeny, tiny dent in the huge "Patterns To Be Finished" list and managed to squeeze in a little stitching.

Here's what I'm working on now:
A little QR Code love  :)

June 29, 2012

Craft Wars on TLC

Craft Wars is a new competition show on TLC that pits crafters against each other in two phases of craft trials. The show debuted this past Tuesday, but I didn't get a chance to watch it until this morning. Tori Spelling hosts the show, and Stephen Brown (Glitterhouse Studios), Jo Pearson (Creative Expert for Michaels), and Erica Domesek (P.S.-I Made This) are the judges.

I don't really know how I feel about the show yet. I like the show's concept, but the way the judges speak and the things that they say to the contestants seem really fake and forced to me. Overall, the show was fun to watch, so I'll give it some more time.

Have you watched the show? What do you think?

June 28, 2012

Happy New Wallpaper

I feel like I am in a funk and in need of a little inspiration. So, I've been getting caught up on reading my favorite blogs, hoping that something will light a spark. I think I found it!

Mollie from Wild Olive is sharing this sweet cloud wallpaper with her readers. Catching a glimpse of a smiley cloud is the perfect little pick-me-up.

Cloud wallpaper from Wild Olive

June 25, 2012

Design Block! Grr . . .

I have been working on a pattern for a week now and have found myself blocked, mega-blocked even. I make myself take breaks when I start to get frustrated so I don't just give up on the pattern entirely, but I really need to get it done to meet my deadline.

Any advice?

June 21, 2012

The "C Word"

So . . . the "C Word" has plagued me for years. I don't know why I give it any place in my life and why I can't let go of it.

Clutter! Clutter sucks. I hate clutter. But, I hate thinking about clutter, trying to get rid of clutter, and actively preventing clutter even more. I am the kind of cleaner/organizer that makes semi-organized piles of stuff and then moves that stuff around from room to room and then eventually hides it in a box and hopes it goes away. I would post photos of said clutter, but I can't even bring myself to document its existence (other than in this post).


My In-Laws are visiting for a week and are getting here tomorrow. I have spent the last two days cleaning. Every time I try to get the house cleaned up for company, I wish I were better at keeping things organized and clutter-free! It would be so much easier if the house was cleaner all the time. {If my husband is reading this, he is nodding his head vigorously at this idea.}


What do you do to stay organized and keep clutter under control?
Related Posts Plugin for WordPress, Blogger...