Showing posts with label summer. Show all posts

June 19, 2013

Summer Stitching Club with Mollie Johanson | Wild Olive

Last month, I wrote about a stitch-a-long that I was really excited about. The Wild Olive Summer Stitching Club with Mollie Johanson started at the beginning of June, and now I'm hooked on mini-embroideries and hexies!

Fabric & Floss for Summer Stitching Club
When I last posted about the SSC, I had picked out my fabrics and embroidery floss but hadn't gotten started yet. While at the fabric store, I found myself stuck trying to figure out what fabrics I wanted to use. I saw the same blue that Mollie is using, and tried to resist getting it, but it was so cute, I had to copy her! After I had the blue selected, it was easy to pick the rest. This picture shows a yellow fabric with white circles, which is similar to another fabric that Mollie is using, but I don't think I'll be using that one after all.


When the second week of the SSC began, I still hadn't started cutting fabric or stitching the designs. I was really worried that I would be behind the entire summer, but once I got started, there was no stopping. I was a stitching machine! I even have most of my non-embroidered hexies made, waiting to be stitched together.

2013 Summer Stitching Club - Week 1-3
At the end of the summer, all the hexies can be stitched up together to make a mini-quilt or placemat or whatever else you can imagine. I think I might make mine into a pillow, so I changed the orientation of the hexies. I have a tendency to change my mind, a lot, so who know what it will actually become in the end. I'm excited to find out!

I'm loving making hexies!
I've spent way too much time checking out everyone's projects on Instagram and in the Wild Olive Flickr group, but it's a lot of fun to be creating something right along with people from all over. It's also neat to see how people tweak the project and make it their own. The summer just got started; it's not too late to join us!

May 26, 2013

More Embroidery Please! - Summer Stitching Club

I've been cross stitching for a long time, but I never really did much embroidery until about two or three years ago. For my first project with embroidery, I stuck to simple back-stitched names on Christmas stockings I made for my family and some close family friends. I'll probably share that project someday, but here's a peek at how they turned out.

Christmas Stockings
I really enjoy all the love that goes into something that is hand-stitched, so I've been trying to incorporate more embroidery into my projects. Right now, I'm working on an ABC Quilt for my son that has a lot of hand embroidery, and I love the way it's all coming together. I've been on the lookout for another embroidery project, maybe something for myself, and I found the perfect thing!

I've been following Mollie's Wild Olive blog for a while now, and was really excited when she wrote about her summer stitching club. Each week of June, July, and August she will send a tiny embroidery pattern to stitch up that will be made into little hexies. The tiny patterns will be great for a busy mom like me to finish quickly, and I'll finally get to make some hexies. I've been dying to try them! At the end of the summer, they'll all be put together into a cute little project. I'm really looking forward to my weekly emails!

If you want to join in too, it's just $5 if you sign up by June 2nd ($8 starting June 3rd). I think it's an awesome deal! You can click the picture below to go to her site.


August 24, 2012

Did You Miss Me?

I've been mostly M.I.A. recently, but it was for good reasons. August is usually a pretty busy/crazy month for my family, but it was even more so this year. Here's a glimpse into what August had/has in store for me this year:
  • My birthday
  • Our wedding anniversary
  • My husband's birthday
  • My shop featured HERE
  • My husband slammed with work and gone the whole month
  • Living like a single mom (with all the duties that go along with it)
  • A teething 14-month-old (molars!)
  • Trying to spend time with my next to youngest sister before she goes off to college
  • Working on shop stuff
  • Our neighbors moving - We have a shared driveway and have to deal with the movers, workers, stagers, realtors, house shoppers, etc. outside our front door and blocking our garage and driveway.
  • Cousin's baby shower
  • Wedding dress shopping with another sister
  • A family reunion
  • Blah, blah, blah
It's been an exciting month so far, but I am looking forward to life slowing down a little bit.

July 12, 2012

Insalata Caprese - The Best Salad Ever!

My all-time favorite salad is the caprese. Maybe it's because I'm Italian. Maybe it's because it is so simple to make. No matter what the reason, this salad is unbelievably delicious.

Traditionally, caprese salads are made using thick slices of tomato, sliced rounds of fresh mozzarella cheese, and basil leaves with a drizzle of olive oil and balsamic vinegar drizzled over the top.

Picture of insalata caprese (caprese salad) from wikipedia
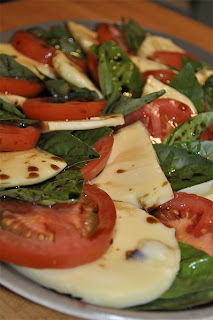
Insalata Caprese - from Wikipedia

The way I make my caprese is a little different. It all started when my husband (then fiance) was in law school and I was the only one working (at a craptastic job). I never let myself buy fresh mozzarella, but I really wanted to make a caprese salad. I had some cherry tomatoes, some fresh basil, and . . . string cheese! Yup. String cheese. I sliced those cheese sticks into rounds, cut the tomatoes in half, and chopped up the basil. I topped it all with a few drizzles of olive oil and balsamic and gave everything a quick toss. I was a happy camper. The texture of the cheese wasn't right, but the flavor was good. I'd like to say that this was a one time deal, but I have to confess that I think I made it this way until we got real jobs and I let myself buy the right ingredients.

I have been buying real, fresh mozzarella to make my caprese salads for a few years now, but I still use cherry tomatoes and make it like a tossed salad.

Pictue of the ingredients for a caprese salad - tomatoes, mozzarella cheese, and basil

Insalata Caprese

10 oz cherry or grape tomatoes
8 oz fresh mozzarella cheese
1/4 cup fresh basil, chopped (measure after chopping)
1 Tbsp olive oil
2 tsp balsamic vinegar
salt and pepper

Cut the tomatoes in half (lengthwise for grape tomatoes).

Caprese salad - tomatoes, fresh mozzarella cheese, basil, olive oil, and balsamic vinegarIf you are using bocconcini (small fresh mozzarella balls), you can leave them whole or cut them in half or quarters. If you are using larger balls of fresh mozzarella, cut the ball down into pieces that are close to the same size as your tomatoes after slicing.

Tear, slice, or chop the basil.

Combine the chopped tomatoes, mozzarella, and basil in a bowl. Drizzle the olive oil and balsamic vinegar on top. Season with salt and pepper to taste. Mix everything well.

You can eat the caprese right away, but it tastes better if you let it sit for a bit and let the flavors marry.

A Quick Tip For Chopping Basil

Step by step picture tutorial for how to make a basil chiffonade and how to chop basil
1: Remove the basil leaves from the stalks.

2: Stack the leaves, largest on the bottom. Work your way up to the smallest leaves. This step does not have to be neat and tidy. Just make sure you have the largest leaf on the bottom.

3: Roll the leaves up. Make sure the smaller leaves are covered as much as possible.

4: Start at one end of the basil roll. Make thin slices down the length of the roll.

5: You now have a bunch of basil ribbons, or a "chiffonade." Basil ribbons are beautiful, so you can stop here if you like.

6: To finish the chop, slice across the rolls of basil.

June 5, 2012

Lime Grilled Chicken with Black Bean and Mango Salsa

First of all, I apologize for the awful, blurry photos in this post. They were taken with my old digital camera, before I knew how to take pictures of objects close up. The next time I make this dish, I'll take some new photos. The food may look blurry here, but it sure is tasty!

I found this recipe online a few years ago. I wish I could remember where so I could give credit! It has become one of my favorite summer time meals.

The recipe is easy to make and very flavorful. Sometimes citrus marinades are too strong, but this one is nice and light. I tend to make more of the salsa than I really need so I can snack on it while waiting for the chicken to grill. :)

I usually slice the chicken into strips after grilling it, and I serve it with some brown rice.


Lime Grilled Chicken with Black Bean and Mango Salsa

Salsa

1 can (15 oz) black beans, drained and rinsed well
1 ripe mango, peeled and finely chopped
1/4 cup chopped red onion
2 Tbsp chopped cilantro
1/2 jalapeno pepper, finely chopped (optional)
Juice of one lime

Chicken Marinade

4 boneless, skinless chicken breasts
2 tsp grated lime zest
Juice of one lime
2 tsp olive oil
salt
pepper

To make the salsa:

In a medium bowl, mix together the black beans, mango, red onion, cilantro, lime juice, and jalapeno pepper. Set the salsa aside while you prepare and grill the chicken.

To make the chicken:

Preheat the grill or broiler.

Place the chicken in a shallow dish. Salt and pepper both sides of the chicken. Add the lime zest, lime juice, and oil. Rub the mixture into the chicken. Cover and let stand for 15 minutes.

Place the chicken on the grill rack or broiler pan (4" from the heat). Cook, turning once, until the chicken is no longer pink in the thickest part (10-12 minutes).

Serve the chicken with the salsa.

Makes 4 servings

June 2, 2012

A Perk of Summer

I really, really dislike feeling hot, BUT hot days do have their perks. Today's hot day perk was a nice, refreshing afternoon cocktail. After being pregnant for what felt like a lifetime and then nursing for a year after Mr. Baby's arrival, an afternoon cocktail was a distant memory. I know it's silly, but it was really nice to finally be able to have a drink in the middle of the afternoon if I wanted to!

Today's cocktail was a Skyy Vodka invention called a Cherry Patriot. It's strong, but still easy to drink.

Cherry Patriot

1 1/2 oz Cherry Vodka (Skyy Infusions)
1 oz Lemon Juice
1/2 oz Cointreau
1/2 oz Sweet Vermouth
3/4 oz Rye Whiskey
2 oz Club Soda

Mix all ingredients in a shaker with ice. Shake and strain into a cocktail glass.

Garnish with a cherry (or two). Because they're pretty . . . and yummy after they soak up a bunch of booze.  :)
Related Posts Plugin for WordPress, Blogger...