Showing posts with label Etsy. Show all posts

March 25, 2013

Cross Stitch Kit Giveaway

Last September, I wrote about my custom QR Code pattern being mentioned in Cross Stitch Crazy Magazine. I was super excited and thanked the magazine for mentioning my shop on the CSC Facebook page.

Someone responded to me, and I ended up swapping a few emails with a woman at the magazine. I set up three cross stitch kit giveaways with them, and my last giveaway issue is out now! I got my copy of the magazine in the mail today, and I just had to share.

I already sent out a Rainbow Rain Cloud Kit to a lucky lady who won the first giveaway. The winner of the second giveaway will be chosen next week, and they'll be receiving my Saving Planet Earth Kit. Lastly, in the newest Cross Stitch Crazy issue, my Caffeine Molecule Kit is up for grabs! The winner will be chosen on May 1st.

I really hope the winners like their new kits!


September 10, 2012

Shop Makeover

I've been getting a little antsy with my Etsy shop and decided that it needed a bit of a makeover. Running around after a 15-month-old, cleaning the house (sometimes), cooking dinner, and filling orders (especially after my magazine mention!) really cuts down on the amount of time I have to work on my shop. So, even though I have a long list of changes I'd like to make, I've been trying to stick to small changes or changes that can be broken down into smaller chunks of work/time-commitment so eventually it will all get done.

Here are some things that have been done:


1. New shop banner (new font):

New Etsy shop Banner for Acts of Craftiness

2. New packaging (trying out a few things) - stitched parchment paper:

New packaging for Acts of Craftiness on Etsy

Here are some things I am currently working on:


1. Update all pattern files
 * This is a HUGE task, so I have broken it down into steps. I think I'm about a quarter of the way done, but right now the light at the end of the tunnel is very dim.

2. Launching a new product line

3. Setting up monthly giveaways through the end of the year (or longer if I like them!).

September 6, 2012

Breaking News!

Four days ago, I woke up to a message from a customer in the UK asking about my Custom QR Code cross stitch pattern. Along with her question, she mentioned that she saw me in Cross Stitch Crazy Magazine. What?! I wasn't fully awake, so I figured I read that part wrong. I rubbed my eyes a few times before re-reading the message, but it was still there. I hadn't submitted anything to the magazine, so this was an awesome surprise!

I ordered a paper copy of the magazine, but it wasn't actually for sale to non-subscribers yet and they are in the UK, so I knew it was going to take a while to get to me. The issue (November 2012 - #169) was released today, and I downloaded it through the Cross Stitch Crazy iPad app.

My face hurts from non-stop smiling!


September 4, 2012

7 Monthaversary

My shop's 7 Monthaversary was on September 1st. August was pretty slow, but it allowed me to spend some time relaxing, stitching, and celebrating.

Here are a few highlights from my 7th month on Etsy:
  • I reached 70 sales
  • I added some new QR Code ornament patterns and kits
  • I reworked my molecule patterns and stitched them up
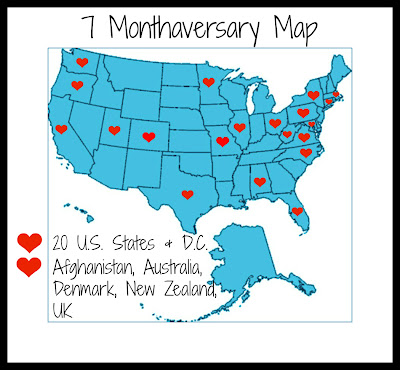
  • I added 1 new state to my reach map (I'm up to 40% of the country!)
Acts of Craftiness celebrates 7 months on Etsy!

August 24, 2012

Did You Miss Me?

I've been mostly M.I.A. recently, but it was for good reasons. August is usually a pretty busy/crazy month for my family, but it was even more so this year. Here's a glimpse into what August had/has in store for me this year:
  • My birthday
  • Our wedding anniversary
  • My husband's birthday
  • My shop featured HERE
  • My husband slammed with work and gone the whole month
  • Living like a single mom (with all the duties that go along with it)
  • A teething 14-month-old (molars!)
  • Trying to spend time with my next to youngest sister before she goes off to college
  • Working on shop stuff
  • Our neighbors moving - We have a shared driveway and have to deal with the movers, workers, stagers, realtors, house shoppers, etc. outside our front door and blocking our garage and driveway.
  • Cousin's baby shower
  • Wedding dress shopping with another sister
  • A family reunion
  • Blah, blah, blah
It's been an exciting month so far, but I am looking forward to life slowing down a little bit.

August 4, 2012

The Evolution of a Light Box

Before I opened my Etsy shop, I did a lot of research and read a lot in the forums and in the Etsy Sellers' Handbook to prepare myself, hoping to set myself up for success. One thing that you hear and read over and over and over again is that good product photography is key to having a successful Etsy shop. It makes complete sense; your photos give the buyer their first impression of your item. If your pictures are blurry, unfocused, or dark, the buyer may never click on your item to get to the awesome description you wrote.

I know that good lighting and clean backgrounds (especially white backgrounds) are what many strive for, so when setting up to take my first product photos, this was my aim too. I started out with a very basic set up and have ended up with a pretty sweet, homemade light box.


Here is the evolution of my light box:
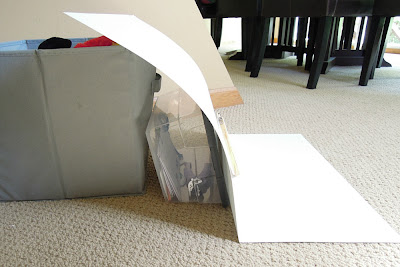
Basic photo shoot set up using white poster board
My super basic photo set up

#1: As Basic As It Gets


White background - check.
Natural light - check.
My pictures should be awesome, right? - nope.

So, how basic is basic? As you can see in the picture, basic for me meant white poster board propped up against random household objects and placed on the floor in natural light. I probably looked really silly laying on my stomach on the floor trying to get in close to take my pictures. I'm glad my husband wasn't home during my photo shoots!

At first, I thought that my pictures looked great with this set up, and I was super excited about getting all my items photographed. After being on Etsy for a short while, I realized that the pictures I took with this set up were not great and that the grayish background had to go. Here's an example:
Example photo before and after - basic photo set up vs. light box and photo editing
From my first photo shoot to my new light box + minor editing

#2: My First Light Box


I won't go into great detail here because this light box sucked.

My first light box began its life as a plain old brown cardboard box. I used this tutorial to help me. The materials were easy to find (a cardboard box, tissue paper, tape, white poster board), and the process took less time than I thought it would. I removed the top flaps of the box and cut out panels on the left and right sides. Then, I taped sheets of white tissue paper over each side cut out. I used the poster board as the background for the picture. I got two cheapy desk lamps from Target and pimped them out with full spectrum light bulbs from Amazon. Full spectrum bulbs are more expensive, but they will help you get a nice, white light that you can't get with regular bulbs. They really help improve light box photos. The lamps are positioned next the tissue paper covered cut outs, shining into the box.

Using this light box, I was able to control my lighting much better than I could with natural light, but I still couldn't get nice, white photos (even with photo editing). I always had shadows in the corners/edges of my photos, and cropping didn't always fix the problem. After reading more about light boxes online, I realized that one problem was that the inside of my box wasn't white. Light wasn't bouncing off of the brown areas, which created the shadows. I could probably have gotten away with taping some white paper inside the box, but I had a better idea. I'd start with material that was already white had a stronger structure.

I wish I had a picture of this light box, but after many hours trying get good photos using it, I destroyed it in frustration.

#3: My Second Light Box
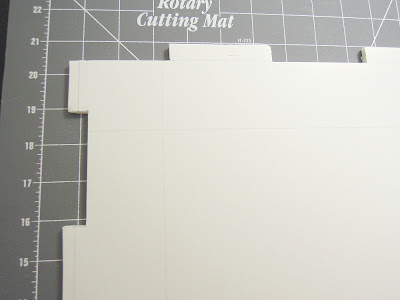

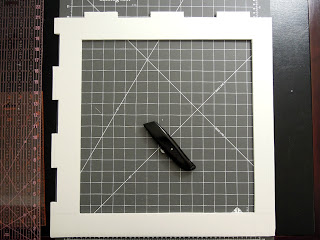
One panel of a collapsible light box showing the "tabs" you cut
An example of the "tabs"
I used this tutorial to help make my second light box. This set up seemed to fit all of my needs. Since it's made out of white foam core, the inside is white, which helped reduce the shadows I had in my photos using my first light box. Foam core is more rigid than a regular cardboard box, so the light box is a lot more stable. As an added plus, it's collapsible, so I can take it apart for flat storage. The pieces fit together without tape, so it's easy to assemble and disassemble. This is a very nice feature since my photo set up is on the dining room table. We don't use that table often, but it's nice to be able to easily stash my shop stuff away when we have company.

To make the light box, you start out by cutting down your pieces of foam core into squares. Then, you have to carefully plan out where you'll cut out tabs on the edges of intersecting walls of the box. If you cut the tabs correctly, your box walls should fit together like a 3D puzzle. Use the poster board inside the box as a seamless background. Shine desk lamps on the inside walls on the left and right (this is the thing that ultimately didn't work for me and led to my third light box).

I was so excited to have this new light box finished. I wanted to retake all of my photos and update all my Etsy listings. But, I took one series of photos with it and knew something still needed to be tweaked. My photos were just as bad as the ones I took with my brown cardboard box, ugly shadows everywhere. Shining the lights on the solid inside walls of the box made it very difficult to bounce the light in the right places. But, then, I had an idea! What if I made cut outs on the left and right sides, covered them with white tissue paper, and shined the light through the paper like I did with my first light box? Brilliant!

I really wish I had taken step-by-step photos of the process, but when I made my light box, I wasn't planning to share it with anyone. You can see step by step pictures in the tutorial I linked. And, again, I don't have a picture of this version of my light box, but it's the same as my 3rd/current light box except that the sides were left whole.

#4: My Third (and Hopefully Final) Light Box
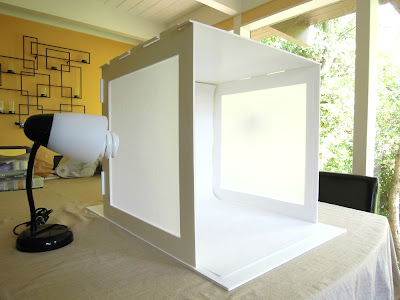

My current light box set up made from white foam core and tissue paper.
My current light box - I'm very happy with it.  :)
One light box cut out before being covered with white tissue paper
One cut out before being covered with white tissue paper
I used my second light box as the base for this box. I made cut outs on the left and right sides (marked two inches in from the edges), covered the cut outs with white tissue paper (tape in place), and got my lamps in position on the sides. Done.

Another realization I had while putting this together was that the "white" poster board I was using wasn't really pure white, and it was affecting my photos negatively. So, I used some very white drawing paper meant for an easel for my back drop. It's lighter weight than poster board, so I needed to find a way to anchor it in place so it wouldn't slide down inside the box. The solution I came up with was to cut tabs at the top end of the paper and feed the tabs through the gaps at the top of the light box. The top piece of the light box helps hold the paper in place. You can see what I mean in the picture below. Another thing I like about using easel drawing paper is that I have a whole roll of it, and it's easy to swap in a new piece if my background paper gets dirty or marked up from moving things around on top of it.
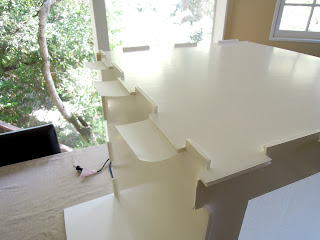
Paper background "tabs" hanging out the back of a light box
Paper "tabs" hanging out the back of the light box
This set up has definitely been the best of everything I have tried. My pictures still need a bit of editing to get a really white background, but it's nothing compared to what I was working with before. I've had a lot of luck using a combo of PicMonkey and FotoFuze to get my white backgrounds.

* In my pictures, you can see that my box is sitting on top of another piece of white foam core. This piece is not necessary for making or using your light box. I had an extra piece laying around, so I use it as a base for my box.

August 1, 2012

6 Monthaversary!

It's my Etsy shop's half birthday! The last six months have flown by at warp speed, so it's nice to sit down and look at how far the shop has come. Even though I could be considered a "creative," I am addicted to number crunching, spreadsheeting, and color-coding. I have fun analyzing sales and revenue, which items are more or less popular, the ups and downs of views, and all the love my shop and items have gotten (love those hearts!) - Not all of these end up in spreadsheets!  :)

While putting together my six month reach map, I realized that I had missed two countries on my last map (Afghanistan and New Zealand) - Oops! This month I got to add two new U.S. States, Colorado and Missouri - only thirty-one more to go!
Six month reach map for Acts of Craftiness on Etsy
Six Monthaversary

July was about the same as June as far as views and sales go, but I'm not really surprised by that. I didn't add very many new items in July, but I did do a lot of work in the shop, tweaking listing info and photos.

Yesterday, I got to be the center of attention for the SF Etsy Team's first shop critique Twitter Chat. I was a little nervous about having people checking out my shop, specifically looking for changes that could be made, but it was a really awesome experience. When you think about a "critique," you automatically think about "what's wrong with what you did," and that can be intimidating. But, good critiques also point out things that you did well. The SF Etsy Team gave a great critique. It was really nice to get positive feedback about things that I've done well in addition to constructive comments about things I could improve upon. And, instead of just leaving me with a general list of improvements that could be made, they also helped brainstorm ways to implement those changes. I often find myself wanting to make a change (or knowing that one needs to be made) but not knowing where to begin. This is where having more heads is better than one. Now, thanks to my shop critique, I have more awesome shop updates in the works.

August is a happening month in our family. My birthday, our wedding anniversary, and my husband's birthday are coming up; they are actually on three consecutive days! Plus, we have some other events for family and friends to attend. I'm hoping things will be exciting in my shop too. I'd love to have even more to celebrate.

July 15, 2012

Weekend Wrap-Up

I've been behind on posting because I have actually managed to keep myself super busy with productive stuff the past few days. Here are the highlights of my weekend:
  1. Celebrated my dog's 3rd birthday by taking her to the dog park to get some energy out and to the groomer to get a pedicure.
  2. Cleared a bunch of super tall weeds from our front yard. It no longer looks like it's been neglected for three years, and you can see the flowering plants and trees the weeds were blocking now.
  3. Finished stitching some more new QR code cross stitch pieces.
  4. Stretched all of the already stitched pieces I had laying around and started preparing them for finishing the backs.
  5. Finished putting together my new and improved light box. Hopefully this is the winning design.
  6. Took some product pictures using my new light box.
I still have a few more QR codes to stitch up (more color options). Then, I need to stretch, finished, and photograph the new product line. I'm hoping to get the new items in the shop this week. No more slacking!

Picture of a light box photography set up
The final version of my light box (I hope)!
QR code cross stitch pieces
Only 5 more to stitch up

July 8, 2012

Weekend Wrap-Up

It's been busy at our house the last few days, but I've managed to squeeze in a little time to stitch here and there. I thought I had finished all of my samples for my newest QR Code items, but I may have to stitch up a new one in blue.

After spending hours trying to match up embroidery floss colors with the colors of the ribbon I plan to use, I discovered that I didn't have enough of the blue ribbon I found in my stash. It's a fairly common brand, but after visiting both craft stores in my area, I came up empty. Both stores carry the brand, but they had three other blues - one is too light, one is too dark, and the other is more of a teal instead of a blue.

I was super excited about having the perfect colors chosen, but now I have to figure something else out. In the meantime, the next step for these little guys is to get them stretched and framed in hoops and finish the backs. I'll post pictures when they're done.  :)

Picture of QR Code cross stitch pieces waiting to be stretched in hoops.
Some new QR Code cross stitch pieces

My blue ribbon saga of sadness:


Shades of blue ribbon
Still searching for the perfect blue ribbon


July 1, 2012

5 Monthaversary!

It's time for another shop update! It's been five months since I opened my Etsy shop, and I have never been more excited about my craft. Each new sale gives me an awesome adrenaline rush, and I get inspired to create more.

This past month, I got my 50th sale (half of my 2012 goal!) and I got to add to my reach map (Florida, Washington, D.C., and Denmark). The shop does better and better each month, so I can't wait to see what I can accomplish in month six!

Seeing this map start to fill in is so awesome!

June 30, 2012

Weekend Wrap-Up

I've been slightly more productive since my last WIP post. Besides the regular shop stuff, I reorganized my supplies (in a haphazard sort of way, so I'll have to do a better job next time) and finished two custom patterns. I've also made a teeny, tiny dent in the huge "Patterns To Be Finished" list and managed to squeeze in a little stitching.

Here's what I'm working on now:
A little QR Code love  :)

June 25, 2012

Design Block! Grr . . .

I have been working on a pattern for a week now and have found myself blocked, mega-blocked even. I make myself take breaks when I start to get frustrated so I don't just give up on the pattern entirely, but I really need to get it done to meet my deadline.

Any advice?

June 12, 2012

Great Opportunity: Blogging for Your Creative Business Online Course

April of Blacksburg Belle has a great opportunity for bloggers. She has a four-week online course aimed at improving your creative business blog and bringing in more customers. The modules focus on making blogging fun, distinguishing your blog from your competitors' blogs, developing a content schedule that will attract your target market and build a relationship with them, blog design, how to avoid common mistakes, how to use media/visuals (photos and videos), and maybe the most important thing - the writing!

Click HERE for more info on the course and HERE for info on how to get this awesome course for free!

June 11, 2012

Reading List for Etsy Shop Success

I know I will probably never make enough money from my Etsy shop to make up for the teaching job I left to stay home with my son, but that won't stop me from trying my best to have a successful business.

I've read the Etsy Seller Handbook and read and actively participate in the Etsy forums and teams. While the advice I have gleaned from the Etsy site is extremely useful, there have also been numerous books published in the last few years to aid people in their crafty business pursuits that I'd like to check out. I did some searches for books on the topic and have gotten some book recommendations from other Etsians. I shortened the list to the most recently published books (between 2010-2012) that are also available from the library (because I love the library and free reading!).

I'll be pouring through this list as quickly as I can, writing book reviews to share with you as I go.

Reading List:

  1. How to Make Money Using Etsy: A Guide to the Online Marketplace for Crafts and Handmade Products (2011)
  2. How to Sell Your Crafts Online: A Step-by-Step Guide to Successful Sales on Etsy and Beyond (2011)
  3. The Handmade Marketplace: How to Sell Your Crafts Locally, Globally, and Online (2010)
  4. The Complete Idiot's Guide to Selling Your Crafts (2010)
  5. The Right-Brain Business Plan: A Creative, Visual Map for Success (2011)
  6. The $100 Startup: Reinvent the Way You Make a Living, Do What You Love, and Create a New Future (2012)
My Etsy Shop Owner To Read List


June 10, 2012

Herp Derp

Last weekend's work in progress was actually completed on Monday, but I didn't get it stretched and photographed until Friday morning. Then, we were gone most of Friday and pretty much all of Saturday for my sister's graduation ceremony and party (Congrats again, Allie!).

It's meme-tastic!
Memes are interesting things. Who knows why some of these things get so popular, but it's hard to avoid them. This is the first of the memes I plan to stitch up.

I just added this pattern to the shop today. Hopefully I can get the kit up tomorrow.

June 3, 2012

Weekend Work In Progress

I keep finding myself getting stuck on new cross stitch patterns. I get an idea, start charting it out, and inevitably get stuck on a minor detail (How big should this part be? What color combo looks best? Where should I put this thingy? etc.). All work stops on that pattern and I end up starting work on another new idea so I can feel productive.

This has been going on since I opened my shop in February. So, four months later, I was looking through my in progress pattern files and realized that I have upwards of twenty patterns I have started but haven't finished.

I'd love for my shop to keep growing, so it would really be nice to get more patterns finished and listed. I am always thinking about how to improve and add to my shop, but the saddest part of this work-halting routine I have gotten myself into is that with so many unfinished patterns, I haven't been able to do the thing I enjoy the most, actually stitching up new pieces.

So, I vow to buckle down and finally finish some of my in progress patterns. I finished charting one yesterday and started stitching it up last night. Here is a sneak peek at my work in progress:


June 1, 2012

4 Monthaversary!

I cannot believe that it has already been four months since I opened my Etsy shop. I dreamed about it and researched and planned for what felt like forever before opening the shop. I held off for a very long time (even after becoming a stay-at-home mom) because I was worried about whether or not the time I put into my shop would pay off.

I'm pretty sure that I will never make a living selling cross stitch patterns and kits or my hand-embroidered art and jewelry, which isn't my intention anyway, but I am really enjoying the challenge of running my own business. The shop eats up more time than I ever imagined, but I don't want to half-ass anything, so I feel like it is time well spent.

Every time I see a message pop up on my phone alerting me to a new sale, or I realize that I have new feedback from a customer, I get butterflies in my stomach and want to do a happy dance. There is one thing that tops that feeling - realizing the reach of my work. In my first four months, I have had 37 sales. My patterns, kits, and finished stitched art have been shared with people in 16 U.S. states, plus Australia and the UK. I really love seeing this map fill in more.

April 9, 2012

Holy Cow!

People are stitching up Acts of Craftiness patterns all over the U.S. (plus the UK and Australia)!

Related Posts Plugin for WordPress, Blogger...